
LEGO Wheels and Tires: How to Find Compatible Rims and Axles

You have the shape of your custom LEGO car just right: the wheelbase looks balanced, the fenders follow the body and the chassis is nearly finished. Then the new tires arrive. One refuses to sit on the rim you chose, or a wheel that looks perfect in photographs cannot be mounted on the axle you have already built. It is frustrating, especially when the parts came from different sets or online sellers.
There is a better way to choose wheels for a MOC. Instead of searching for a tire that looks roughly the right size, check three separate relationships: tire to rim, rim to connector, and the complete wheel assembly to the vehicle. The LEGO Group publishes example combinations, BrickLink catalogues matching tire-and-wheel relationships, and independent parts guides help compare dimensions. Together, these resources can turn guesswork into a practical design process.
Choose the mounting system before the wheel design
If you are designing a vehicle from scratch, start at the hub. Will the wheel rotate around a stationary support, or does it need to turn with a rotating Technic axle? Are you building a small display car, a steerable front axle, or a powered model? These decisions affect the center opening you need in the rim.
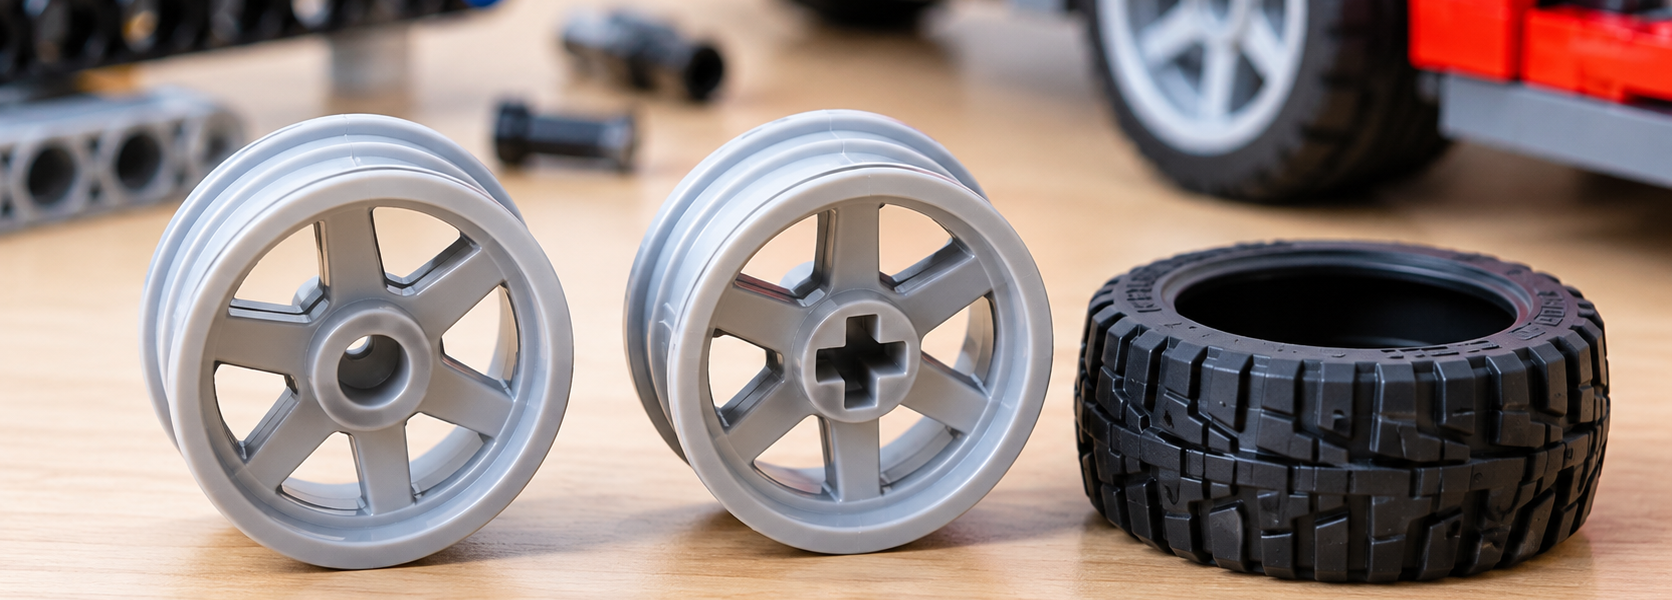
A wheel with a pin hole and a similar-looking wheel with a cross-shaped axle hole should not be treated as interchangeable. An axle-hole rim can rotate with the axle when that axle is properly supported. A pin-based wheel instead needs a suitable connection that allows the wheel to turn as intended. Simply pushing an axle through the nearest available hole is not a mechanical design plan.
LEGO’s official Matching Tires, Rims and Connectors guide illustrates Mini Snap, Half Snap, Snap, Triple Snap and Axle families. These are useful examples, not a complete universal catalogue of every wheel ever produced. The guide also distinguishes a fixed axle support from arrangements in which an axle turns within an appropriate round opening.
Do not confuse tire size with rim size
Part names often contain dimensions in millimeters. A Tire 30.4 x 14 is not intended for a rim with an outside diameter of 30.4 mm. The tire’s catalogued dimension describes the outer tire, while a wheel or rim listing uses the dimension of that separate rigid part.
For example, both rims 55981 and 55982 are listed by BrickLink as 18 mm diameter × 14 mm wide. Their compatible tire 92402 is listed as 30.4 × 14 mm. Those numbers are not contradictory: the tire surrounds the smaller rim.
It is also important to distinguish rim diameter from finished wheel diameter. The latter determines how much space the wheel requires in a fender and where it positions the chassis above the ground. Brick Architect’s Wheel & Tire Guide groups rims by their diameter and explains why taller-profile tires can make a smaller rim’s finished assembly larger than another assembly with a bigger rim.
Four real compatibility examples you can check
These combinations are supported by LEGO’s published examples and the relationships in BrickLink’s catalogue. They establish which tires match the named rims; they do not establish that the assembly fits a particular MOC’s steering system, chassis or bodywork.
| Rim / wheel | Documented matching tire | Connection or design issue |
|---|---|---|
| 34337, 8 × 6 mm | 59895 (14 × 4 mm) or 87414 (15 × 6 mm) | Small wheel in LEGO’s Mini Snap examples |
| 55981, 18 × 14 mm | 92402, 30.4 × 14 mm | BrickLink lists a center Pin Hole |
| 55982, 18 × 14 mm | 92402, 30.4 × 14 mm | BrickLink lists a center Axle Hole |
| 56904, 30 × 14 mm | 30699 or 56898, both 43.2 × 14 mm | Included in LEGO’s Axle examples |
The 34337 and 56904 combinations appear in the LEGO help table. BrickLink separately lists the 55981 and 55982 rims as compatible with tire 92402. The 56904 catalogue page also shows additional matching tires beyond the two LEGO examples. This is why a manufacturer’s quick-reference table should not be mistaken for an exhaustive compatibility list.
A revealing comparison: rims 55981 and 55982
These are the parts to remember if you usually shop by appearance. Both have the same stated outside rim size and a similar spoke-and-faux-bolt design. Both appear in BrickLink’s tire relationships for 92402. Yet their center openings differ: 55981 is described as Pin Hole, while 55982 is described as Axle Hole.
That means a successful tire fit is only the beginning. If your vehicle is built around a pin-based wheel support, switching to the axle-hole rim could require changing how the hub is mounted. If you are using a driven or freely rotating Technic axle, the axle-hole version may be relevant, provided that your axle and bearing arrangement are suitable.
There is one source discrepancy worth making explicit. LEGO’s help table includes 55982 in an example group under Snap, whereas BrickLink labels the part’s center opening Axle Hole. Do not interpret the category heading in the LEGO table as a definitive drawing of the wheel’s bore. For a specific connector, inspect the rim’s actual geometry, review the individual parts and verify the intended assembly. Neither source establishes that every connector mentioned in a broad category is suitable for every wheel in that category.
What to check when changing wheel size on a LEGO MOC
Wheel compatibility on paper is not enough for an actual moving vehicle. Before building the body around a wheel assembly, check the physical space it must occupy. The following design checks are independent editorial advice, not measured performance results for the listed parts.
- Overall diameter: use the mounted tire’s approximate outside diameter, not the rim diameter, when planning arches and ride height.
- Width and lateral position: leave clearance between the sidewall and nearby suspension, body and steering parts. The rim’s center connection and its placement affect where the tire sits.
- Steering envelope: check both straight-ahead and full-lock positions. A wheel may clear the arch when straight but hit a fender or chassis element while turning.
- Suspension travel: if the model has moving suspension, consider its most compressed position. A static display check cannot verify this.
- Rotation and drivetrain: identify which pieces rotate and which stay fixed. Do not lock an axle in the body if the wheel is supposed to rotate with it.
- Appearance: tread design and tire profile affect the visual character of the MOC even when the tire fits the same rim.
For instance, the official LEGO guide lists both 30699 and 56898 for rim 56904. They share a catalogued 43.2 × 14 mm size but have different tread descriptions. That offers a way to compare styling options without changing the basic rim. It does not justify claims about grip, load capacity or performance unless those are separately tested.
How to look up a compatible tire and rim before ordering
- Identify what you already have. Start with the exact part number if known. If restoring a set, find its set number and compare the published inventory and building instructions.
- Check the rim on BrickLink. Search its part number, inspect the item title and look for Related Items or the Tire on Wheel relationships.
- Confirm the tire listing. Record the exact compatible tire number rather than copying only a visual resemblance or approximate dimension.
- Look at the center opening. Check whether the rim is a Pin Hole, Axle Hole or a different connection style. Match that with your planned chassis hardware.
- Check dimensions and alternatives. Consult Brick Architect and Sariel’s LEGO Wheels Chart for size comparisons. Sariel’s chart lets readers explore dimensions and linked tire/rim combinations, but its list should not be assumed to include every historical part.
- Trial the vehicle envelope. Test bodywork clearance, wheel rotation and steering in your actual model or an accurately built mock-up. For an unusual wheel assembly, trying a single pair before placing a large order is sensible.
Do not force a tire or connector because its dimensions look close. A connection that requires stressing a rigid component or unnaturally deforming the tire deserves another catalogue check.
Design ID, Element ID and BrickLink number are not always the same
Another source of ordering mistakes is part numbering. According to BrickLink Studio’s ID documentation, the LEGO Group distinguishes a Design ID, identifying a part design, from an Element ID, identifying a particular design-and-color combination. BrickLink and Studio use item numbers that may differ from LEGO’s identifiers, and some parts have alternate numbers.
If a number printed in an instruction manual does not return the expected wheel on another site, it may be a numbering-system issue rather than proof that the part does not exist. Cross-reference the catalogue name, dimensions, images, alternative numbers and—where relevant—color. In particular, verify whether an online listing is for a bare rim, a tire or an assembled rim-and-tire combination.
Replacing wheels on an older LEGO set
For a restoration, originality may matter more than experimenting with new tread patterns. Start with the set inventory and official LEGO building instructions, then cross-reference the exact rim and tire numbers in BrickLink. If a historical part has several catalogued variants, check the one relevant to the set rather than assuming that any compatible modern assembly matches the original appearance.
Replacement-part availability varies and can change; this guide does not claim that any specific tire is currently sold by LEGO or by a marketplace seller. The goal is to establish part identity and mechanical suitability before shopping, not to promise stock or prices.
Which common mistakes are easiest to avoid?
- Choosing by photo alone: visually similar rims can have different center holes.
- Matching numbers without reading what they measure: tire outside diameter is not rim diameter.
- Stopping after a successful tire fit: you still need a suitable hub or axle and enough room in the vehicle.
- Assuming a short LEGO example table is exhaustive: consult specific catalogue relationships for other candidates.
- Overlooking steering and suspension: wheels that fit at rest might rub when turned or compressed.
- Confusing a complete wheel assembly with a rim listing: always check what the seller is actually supplying.
The one checklist to keep beside your next MOC
Before ordering, record the rim number, tire number, documented rim–tire relationship, center-hole type, intended connector or axle, finished wheel dimensions, and the clearances required by your design. If one of those checks is missing, you are not yet choosing a complete working wheel system.
A successful MOC does not need the most unusual wheel. It needs the wheel that fits its tire, attaches in the intended way and works within the surrounding model. The examples above come from published documentation and parts catalogues; no physical fit, steering, load or durability tests were conducted for this article.
Sources and reference tools
- LEGO Customer Service — Matching Tires, Rims and Connectors: official example combinations and connector families.
- BrickLink — Wheel 34337: small-rim catalogue details and related tires.
- BrickLink — Wheel 55981: Pin Hole description and tire relationships.
- BrickLink — Wheel 55982: Axle Hole description and tire relationships.
- BrickLink — Wheel 56904: compatible tire listings.
- Brick Architect — Wheel & Tire Parts Guide: rim sizes and tire profiles.
- Sariel — LEGO Wheels Chart: independent dimensions and compatible subparts.
- BrickLink Studio — Part IDs and Alternate Numbers: numbering conventions and alternate IDs.
- LEGO — Building Instructions: finding original set documentation.