
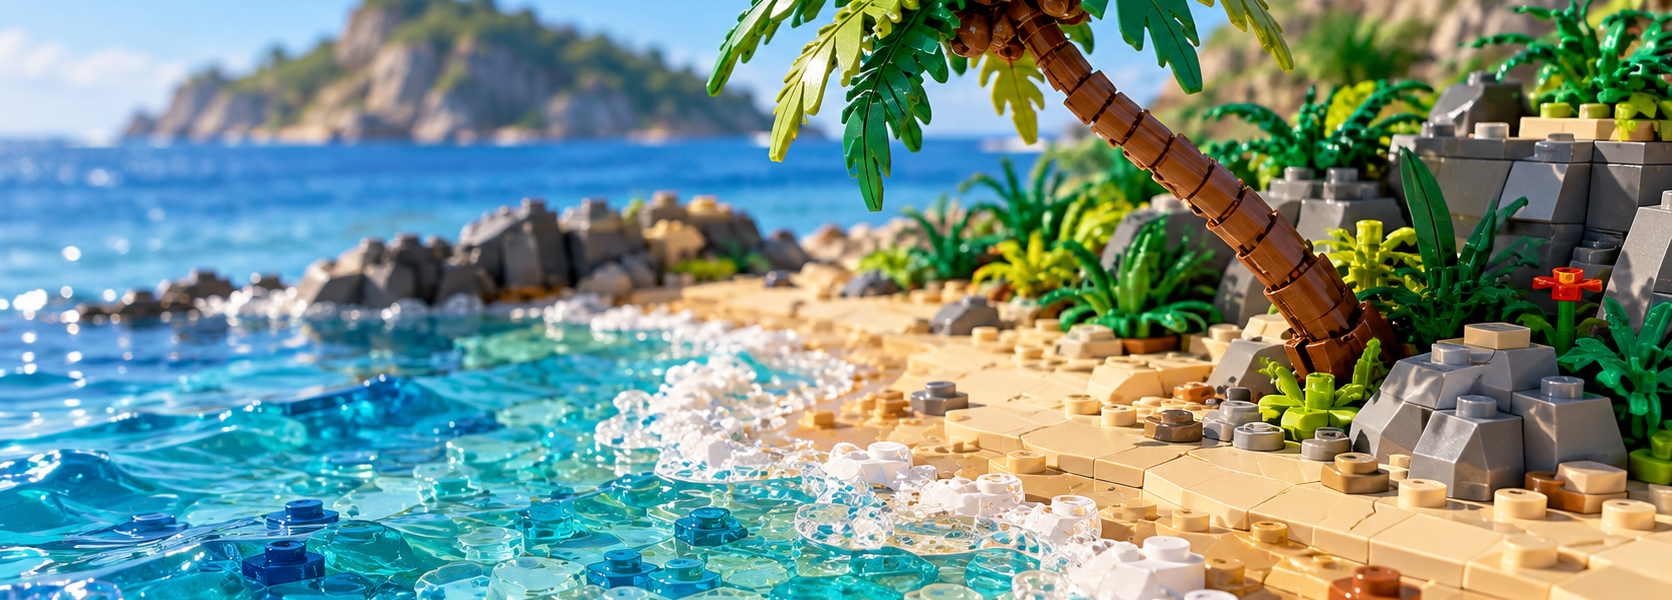

When the skies turn gray, a miniature beach can be a surprisingly cheerful building project. No flights, no packing, and no sand in your shoes: just a few tan plates, blue tiles, a palm tree and the idea of a sunny place that fits on a shelf. And if it happens to be summer where you live, that is an equally good excuse to build one.
But what makes a LEGO beach scene feel like a real coastline rather than a yellow rectangle next to a blue one? We looked at techniques explained by experienced builders, from NOVA-LUG’s collaborative Waterfront project to creative palm-tree solutions by Josh Parkinson (BrickBuiltJosh). Below, we turn those examples into a practical approach to your own tropical beach MOC. The small build suggested here is an editorial design exercise, not a physically tested model or a downloadable instruction set.
Plan one inviting view before choosing parts
Start with a question: what is happening on this beach? Maybe a minifigure has left a surfboard by the water. Perhaps a crab is approaching a picnic, or a single palm shades a quiet spot in the sand. One clear idea makes it easier to decide which details deserve space.
For a first attempt, a 16 × 16-stud footprint is a manageable starting point, although there is nothing special about that size. Sketch a curved shoreline across it. Reserve room for three distinct areas: dry sand, the water’s edge and open water. Position your tallest feature off-center so that it does not hide the whole scene from the front.
Choose a restrained palette. Tan and dark tan suggest sand; light and darker blues establish the sea; white hints at breaking foam; and a little green provides the tropical character. A complicated scene is not necessarily a better one. Often, the shape of the shoreline does more work than an extra dozen accessories.
Build sand with slight changes in height and texture
A flat, perfectly tiled beach can look clean, but it can also resemble a floor. Mix plates and smooth tiles so that the surface has small differences in height. Scatter a few 1 × 1 plates or exposed studs among broader, smoother sections. A handful of dark-tan details beside rocks or at the foot of a tree can provide variation without turning the sand into a patchwork of colors.
The Waterfront collaboration described by Charlie Stephens of NOVA-LUG for BrickNerd offers a useful real-world example. Its builders relied heavily on tan plates and used small tan plates for sand texture. Their larger lesson is about balancing consistency with freedom: different modules needed to meet at the edges, but the beach itself could remain uneven and individual.
You can apply that principle to a much smaller project. Agree on the base colors and the overall height of the shore, then vary the placement of small pieces. Resist the urge to make the waterline perfectly straight. A small inlet or a few staggered wedges can make the scene look more natural.
Create depth in the water without building a deep ocean
The color you see through a transparent LEGO tile depends partly on the pieces beneath it. That makes layered water a useful trick for a beach diorama, especially when there is little room for actual depth.
In the Waterfront project, NOVA-LUG set shared guidelines for the plates under the water and used Trans Light Blue tiles as a consistent surface layer. The waves were left more open to individual interpretation. This combination of a unified base and varied detail helped the separate sections read as one shoreline.
For a tropical scene, consider three visual zones:
- Shallows: start near the sand with a light underlayer. If you have transparent tiles, try a few over tan or a pale blue to suggest clear water.
- Mid-water: introduce a stronger blue or turquoise beneath some of the clear pieces. Keep the change gradual rather than creating an abrupt stripe.
- Open water: use a darker blue toward the outside edge to suggest depth, even if the entire water section is only a plate or two high.
These are suggested color experiments, not a documented parts recipe from NOVA-LUG. Put a clear tile over two different colors before committing to your whole layout, and inspect it in the light where the diorama will actually be displayed. If you own no transparent tiles, two or three well-placed opaque blue shades can still create an attractive sea.
Let the surf break in irregular shapes
Water starts to feel alive when its edge is not a solid white border. Add a few white tooth elements, small slopes or plates to mark the spots where waves touch the sand. Extend one or two transparent wedges into the sea around them. Leave gaps between clusters of foam and vary their widths.
For a striking example, look at the coastal scene by Faëbricks covered by The Brothers Brick. The article specifically highlights white foam formed partly from tooth elements, with transparent wedges surrounding it. The unusual part choices make the wave feel lighter than a uniform wall of white bricks.
Try building the first wave as a thin, broken curve across the shoreline. Then add a second, shorter ripple farther out if space allows. Keep some clear water visible between the two. The reader’s eye should be able to follow where the sea meets the beach without every stud being outlined.
Give your palm tree a little personality
A palm can establish the setting instantly, but an absolutely vertical trunk with identical leaves at identical angles may look stiff. A subtle lean or an uneven arrangement of foliage is often enough to suggest something more organic.
Builder MorlornEmpire used flex tubing to form palm trees in the Deeper diorama featured by The Brothers Brick. The tubing gives the trunks a curved silhouette. Another inventive technique comes from Josh Parkinson (BrickBuiltJosh). In his BrickNerd feature on the LEGO sausage element, he explains how dinosaur tails (part 51274) became curved palm trunks while the sausage element (33078) helped position palm leaves at varied angles. The curved bar acts as a practical connector rather than a visible hot dog.
Those are inspirations, not parts you must buy. A short trunk built from brown round bricks or other pieces you already own can serve a small diorama perfectly well. Arrange leaves unevenly and use intended clips or flexible elements if you need an angle. Avoid forcing rigid pieces into stressed connections.
Parkinson’s separate guide to LEGO foliage is also worth reading. It discusses how seven-fingered palm leaves, including part 10884, can create height and variety in ground vegetation rather than being reserved for treetops. That is helpful if you want a few dense plants at the back of your beach without adding another tree.
Use details to suggest a holiday, not fill every gap
Once the shore works, select two or three small storytelling details. A towel made from colored tiles, a surfboard, a tiny cooler, a crab or a pair of sandals can make a build feel inhabited. Try placing the accessories as if a minifigure had just stepped out of the scene: a board leaning against the palm, a towel facing the sea and footprints suggested by uneven studs.
Do not treat every empty space as a problem. Open sand helps the colorful water and palm tree stand out. Likewise, a patch of bare shoreline provides contrast with foamy waves. If the scene looks crowded, remove one element rather than adding a fourth attraction.
A weekend challenge: make a 16 × 16-stud tropical cove
Here is an adaptable project outline rather than a verified bill of materials. Use a plate or other secure base and substitute pieces from your own collection.
- Mark the shoreline. Give roughly a third of the footprint to water, with a gentle curve so the sand does not form a straight rectangle.
- Build a stable foundation. Secure the land and sea sections at compatible heights, using plates underneath where necessary.
- Texture the sand. Cover most of the land with tan, then add a few small dark-tan accents and changes in height.
- Layer the colors of the sea. Use lighter shades near shore and a darker blue at the outer edge. Put transparent tiles where they make the biggest difference.
- Add a broken ribbon of foam. Place small white pieces irregularly along the shore, supported by a few translucent or transparent shapes.
- Anchor one palm. Set it behind the main action, check the strength of the trunk and keep its leaves from hiding the beach.
- Tell one small story. Add a towel and minifigure, or a board and tiny crab. Stop when the scene feels complete.
Step back and look from minifigure height. Can you see the shoreline? Does the palm silhouette read immediately? Is the water clearly lighter near the beach than at the edge? These simple checks matter more than an exact piece count. We have not assembled or physically tested this particular 16 × 16 layout, so adjustments may be necessary for stability and part fit.
Short on pieces? Spend them where they show
If transparent blue tiles are scarce, place them close to the waterline or around the main wave rather than covering the whole sea. If you own just a few leaf elements, make one well-positioned tree instead of three undersized ones. Reuse plain plates as hidden structural layers, and keep unusual pieces for visible features where their shape has real impact.
For an additional source of build ideas, LEGO’s official Creator 3in1 Surfer Beach House 31118 instructions are available to view. They can provide reference points for seaside accessories and small structures; buying that retired set is not necessary for this project, and its instructions are not instructions for the original diorama described here.
Want a bigger layout later? Design the next section so that its sand height and water colors meet the edge of your first scene. That is a small-scale application of the modular thinking documented by NOVA-LUG: decide what neighboring sections must share, then let their individual features vary.
Three mistakes worth avoiding
- A ruler-straight coast: give the shoreline a few shallow turns, even if the base is square.
- Water with no variation: establish a lighter shallow zone and darker open water, or use a broken foam line to create movement.
- Too many competing details: leave enough quiet space that the focal point is obvious at a glance.
Also check the basics before moving the diorama: a tall palm needs a secure attachment, and loosely balanced water elements can scatter when the base is lifted. For any unusual connection, avoid stressing the parts simply to achieve a particular angle.
A small beach that can brighten any season
The most useful lesson from these builders is not that a tropical beach requires rare elements. It is that thoughtful choices make ordinary pieces convincing: uneven tan plates read as sand, clear tiles over changing colors suggest shallow water, irregular white details become surf, and a gently curved trunk gives a palm its character.
So, whether it is a rainy autumn afternoon or a weekend that simply calls for something colorful, clear a little space and build a shoreline of your own. Start small, experiment with what you have, and let the beach grow only when you have another idea worth adding.
Sources and builder inspiration
- Charlie Stephens / NOVA-LUG, BrickNerd — On the Waterfront: Setting Standards for Collaborative Builds — modular coastline standards, sand texture and layered water.
- Josh Parkinson (BrickBuiltJosh), BrickNerd — A Builder’s Guide to the Scrumptious LEGO Sausage — curved connectors and palm-tree techniques.
- Josh Parkinson (BrickBuiltJosh), BrickNerd — Lush Landscaping — foliage shapes and seven-fingered palm leaves.
- The Brothers Brick — Preparations for an Adventure Across the Ocean Waves — foam and clear wedges in Faëbricks’ scene.
- The Brothers Brick — The Deeper Picture — flex-tubing palms in MorlornEmpire’s model.
- LEGO — Creator 3in1 Surfer Beach House 31118 building instructions — official seaside construction reference.